Vibrations that were scarcely noticed at 2X became untenable at 20X. Even with the mirror locked up on the DSLR camera, the shutter itself was a source of problems. It was necessary to adopt certain shooting techniques to address the deleterious effects of vibration. For lighting the subject I use either electronic flash or incandescent (“tungsten”) light. When electronic flash is used the overall room lighting level is kept low, but bright enough easily see and read all the controls I need to access. While composing and focusing, the subject is illuminated by either a fiber optic illuminator or the modeling lights of the Lumedyne flash system I use. The camera is set to provide rear-curtain flash synchronization. I will then set an exposure time of 1 second on the camera. The lights used to focus and set up the shot are then turned off. A quick test shot is taken without the flash firing to insure that no image at all is being recorded by the ambient room light. You want only the electronic flash to contribute to the exposure. It is rather surprising how bright a room can actually be and still not record any ambient light image when working at these magnifications. I will then turn on the electronic flash and begin taking the stack of images. The exposure sequence goes like this… mirror locked up (pause briefly), shutter is released (any shutter induced vibration settles out very quickly), at the end of the one second exposure time the flash will “fire” while everything is perfectly still. Focus is then moved slightly for the next image in the stack, and the exposure sequence repeated. While this may be a little “vibration reducing over-kill” when using electronic flash, it has proven to be an extremely effective method of eliminating all equipment induced vibration.
When using a continuous light source I will adjust the lighting so that my exposure times are in the vicinity of 3 seconds. Mirror lockup is initiated, and after a brief pause the shutter is released. The shutter vibration damps out very quickly, and the vast majority of the exposure occurs while everything is dead calm. This exposure time does not appear to be so long as to cause any excessive electronic noise in the images. (It is worth noting that some recent Canon DSLR models -- 40D, 50D and 5DII -- have a very useful “live view-silent mode” setting. This mode utilizes an electronic first shutter curtain, and greatly reduces camera induced vibration. It can’t be used with electronic flash, but is a huge help with continuous light, especially in the 1/2 to 1/60 second range where SLR images seem to show the most vibration problems.)
Compared to specialized photomacrography lenses such as the Zeiss Luminars, Leitz Photars, and the Nikon and Olympus offerings, microscope objectives were designed to produce a much smaller image circle on the sensor/film. The DSLRs I use with this technique have a “reduced” sensor size relative to the 35mm format. My Nikon DSLR has a sensor that measures 23.6x15.8mm, with a diagonal of 28.4mm. My Canon DSLR has a sensor size of 22.2x14.8mm, with a diagonal of 26.7mm. The objectives I have tried, when extended to their designed tube length, all cover this format nicely. If a camera with a full frame (24x36mm, 43.3mm diagonal) sensor were used, it would be wise to carefully check the image quality toward the corners and edges of the frame. Typically objectives will illuminate a full frame sensor, but with some the image quality can deteriorate once you record an image exceeding a 26-30mm diameter image circle. This is one reason I try to use these objectives extended to their designed tube length. If used at less than the designed tube length, it is a good idea to again carefully check out the corner image quality. My experience is that I can increase the extension considerably beyond the 160mm or 210mm tube length, and thereby the magnification, with excellent results. (As always, if you use any optic at other than it’s designed extension or magnification, some testing is in order to determine determine any negative impact on image quality.)
When the hardware issues are settled, and a series of images taken, you then need to move to the computer to assemble the final image. The programs I have found to be most useful for DOF image stacking are Helicon Focus, CombineZ and TuFuse. The software can do an excellent job, but additional photo-editing skills are usually needed to re-touch distracting artifacts. As you gain experience and recognize the capabilities and limitations of the software and this technique, you will begin to select your subjects, and arrange your compositions and lighting in a way that makes a successful final image more likely.
It is a lot of work, but the results can be impressive.
When using a continuous light source I will adjust the lighting so that my exposure times are in the vicinity of 3 seconds. Mirror lockup is initiated, and after a brief pause the shutter is released. The shutter vibration damps out very quickly, and the vast majority of the exposure occurs while everything is dead calm. This exposure time does not appear to be so long as to cause any excessive electronic noise in the images. (It is worth noting that some recent Canon DSLR models -
Compared to specialized photomacrography lenses such as the Zeiss Luminars, Leitz Photars, and the Nikon and Olympus offerings, microscope objectives were designed to produce a much smaller image circle on the sensor/film. The DSLRs I use with this technique have a “reduced” sensor size relative to the 35mm format. My Nikon DSLR has a sensor that measures 23.6x15.8mm, with a diagonal of 28.4mm. My Canon DSLR has a sensor size of 22.2x14.8mm, with a diagonal of 26.7mm. The objectives I have tried, when extended to their designed tube length, all cover this format nicely. If a camera with a full frame (24x36mm, 43.3mm diagonal) sensor were used, it would be wise to carefully check the image quality toward the corners and edges of the frame. Typically objectives will illuminate a full frame sensor, but with some the image quality can deteriorate once you record an image exceeding a 26-
When the hardware issues are settled, and a series of images taken, you then need to move to the computer to assemble the final image. The programs I have found to be most useful for DOF image stacking are Helicon Focus, CombineZ and TuFuse. The software can do an excellent job, but additional photo-
It is a lot of work, but the results can be impressive.
In the spring of 2004 I rekindled a childhood interest in microscopy. For a long time prior to that I had been taking photographs up to about 7X using camera bellows and an assortment of “macro” lenses. It wasn’t long before I realized that with low power objectives on my compound microscope it was possible to readily explore and photograph subjects that were too small for my existing tabletop macro arrangement, but were at the low end of the magnification range typically used with a compound microscope. With low power objectives possessing a modicum of working distance I was able to photograph subjects that had previously eluded me. (It needs to be pointed out that the relay optics used with my DSLR on the microscope magnify the primary image formed by the objective about 2X onto the sensor. So the images were recorded, on sensor, at about 8X when using the 4X objective, and recording at 20X when the 10X objective was used.) Many of these subjects were opaque, and it was necessary to illuminate them from above. While my efforts were rewarded, it was obvious that a compound microscope set up with diascopic illumination is not the best instrument for this type of photography. It was cumbersome to maneuver and position the subject exactly as desired, and even more important, there was very little room to place and arrange the best lighting.
Image stacking is essential!
It must be emphasized again that the depth of field in a single exposure is breathtakingly shallow! DOF is sacrificed in order to gain resolution, and each individual photograph is of little pictorial value. It is only practical to work in this manner if you intend to photograph a stack of images and then use software to combine the in-focus portion of each image into a single, “extended DOF” image. Even if you already use bellows or extension tubes for close-up photography, the objective is only one piece of the higher magnification puzzle. It will provide the high magnifications, but you will need additional equipment to move the camera or subject in extremely fine increments. The focusing rail of my bellows, which had seemed so smooth and accurate at lower magnifications, now seemed positively crude. My solution was to mount the camera and bellows on top of an Olympus BHMJ focusing block. This gives me three ranges of focus. The camera bellows allows me to quickly rough-in the desired magnification and focus. The course focus of the microscope block achieves still finer focus, and then the fine focus mechanism of the Olympus focusing block is used to move the camera between shots as the image stack is recorded. Another option would have been to solidly bolt down the camera bellows, and move the much lighter subject. This would work equally well, and perhaps seems more logical, but I do find it much more convenient to be able to control everything from a position directly behind the camera.
It must be emphasized again that the depth of field in a single exposure is breathtakingly shallow! DOF is sacrificed in order to gain resolution, and each individual photograph is of little pictorial value. It is only practical to work in this manner if you intend to photograph a stack of images and then use software to combine the in-
I wished to be photographing at magnifications between 10X and 20X (on sensor) but not in the limited working space afforded by the compound microscope. It would be very advantageous to have 360° access to the subject in order to establish lighting and to facilitate subject orientation. By extending the short focal length macro lenses I was using it would not be too difficult get up to a 20X magnification, but I knew that due to diffraction effects, the resulting effective apertures could not provide the resolution that would be obtained with the larger aperture microscope objective. I considered a stereo microscope, and also began to look at the specifications of various objectives with thought of using them on my camera bellows. Objectives are short focal length, large aperture lenses, so why not put them on the bellows and project the image directly into the camera body? I was most interested in objectives between 10X and 20X. These typically had numerical apertures in the range of 0.25 to 0.40. Since resolution is directly related to numerical aperture, these objectives would provide much higher resolution than a stereo microscope with a much lower NA (working at the same magnification). The tradeoff for this increased resolution would be extremely shallow DOF, but I already had a fair amount of experience with software designed to combine a z-stack for the purpose of “extending” DOF. There were a couple of important considerations when studying the possibilities. Infinity corrected objectives, such as those offered by Mitutoyo, required an additional tube lens. Incorporating this additional component (and the considerable cost of these optics) lead me to also consider finite objectives. Most of the finite objectives had tube lengths of 160mm or 210mm, which would be very workable with my Nikon and Olympus bellows. However the majority were not fully chromatically corrected in the objective itself, having been designed to be used with corrective eyepieces. There was a notable exception. Nikon had produced finite objectives they designated as “CF” (“chromatic-aberration free”). These did not require corrective eyepieces to complete the color correction, and so they seemed to be good candidates. Another key consideration was the working distance. It needed to be large enough to allow me to illuminate my subjects in a variety of ways. My search had narrowed down to “CF” Nikon objectives that had a working distance of about 10mm or greater. While a 10mm working distance is fairly short, when the lens has a very small diameter (as with objectives) and you have full 360° access to the subject it is surprisingly workable.
I already owned a Nikon CF N Plan Achromat 10/0.30 objective. Because of its 9.22mm working distance, it seemed a good place to start. It was marked to be used with a 0.17 cover slip, so there was a concern how it would perform with no cover slip in place. Other objectives that soon caught my attention were the Nikon CF M Plan series. These were designed to be used with no cover slip, and many were available with longer than normal working distances… LWD (long working distance), ELWD (extra long working distance), and SLWD (super long working distance).
After a few test images it became clear that the Nikon CF N 10/0.30 objective provided wonderful image quality when used on the bellows. Still somewhat concerned about using it with no cover slip, I was eventually able to compare it directly with a Nikon M Plan SLWD, and a Nikon M Plan 10. All provided excellent images. The final stacked images held amazing detail, and lack of a cover slip did not prevent the Nikon CF N 10/0.30 objective from matching the quality of the M Plan objectives.
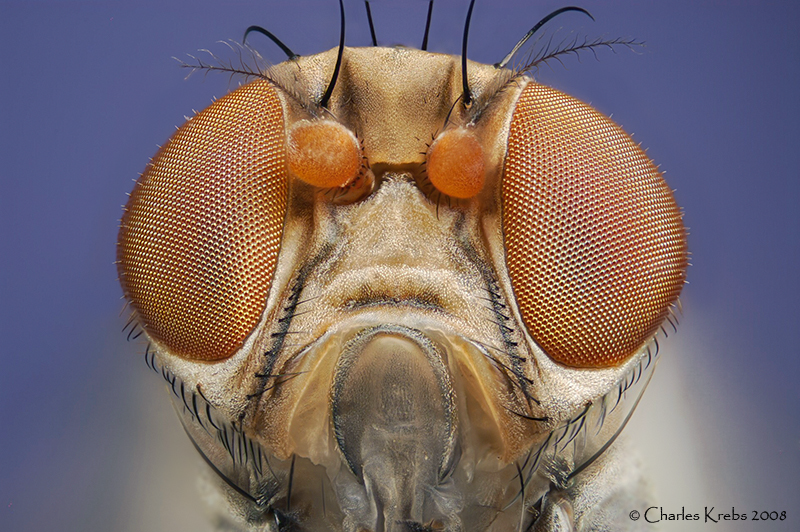
This moth (unidentified) and the False Peacock Fly image below it were photographed on the stage of an Olympus BHS with a 4/0.16 S Plan Apo (wd 9.83mm). For the moth photo a z-stack of 110 separate images was combined into the final, extended DOF image. As these images illustrate, it is possible to do this work on a compound microscope, but the tight working space make lighting and subject positioning challenging.
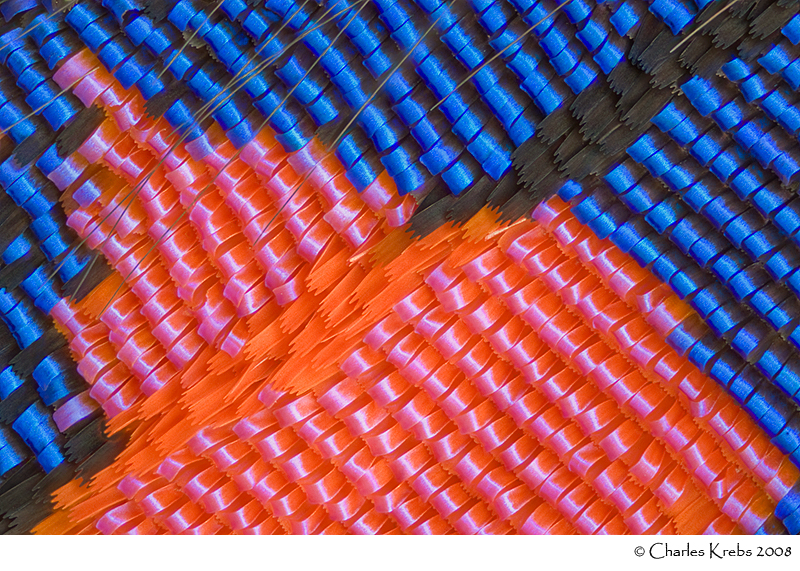
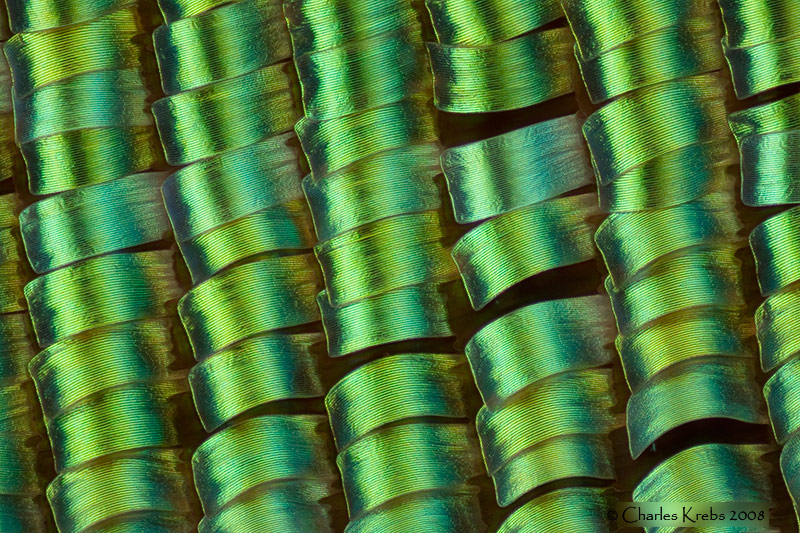
Wing scales of Rhetus periander ("Blue Doctor") photographed at 10X (on sensor) with the Nikon CF N 10/0.30 Plan Achromat. The objective was mounted on a Nikon bellows. The camera was a Nikon D200. From a stack of 20 images.
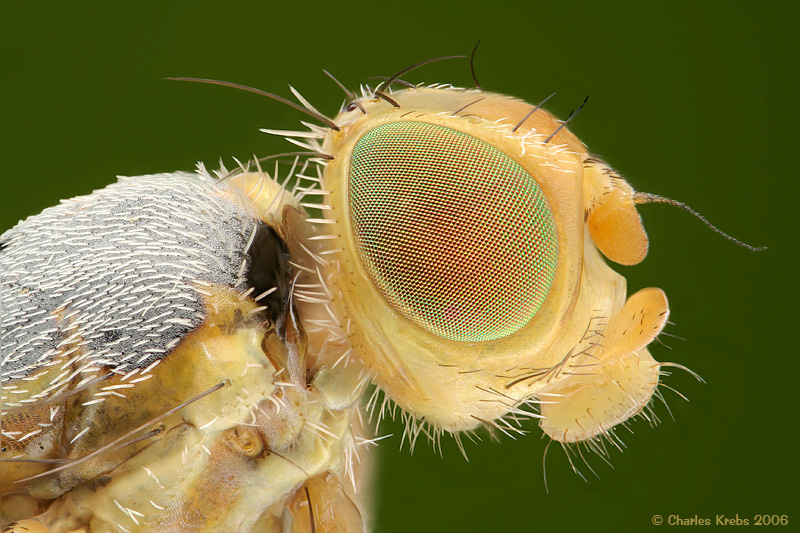
This fly was photographed at 10X (on sensor) with the Nikon CF N 10/0.30 Plan Achromat. From a stack of 99 images. The depth-of-field, fine details, and textures in these pictures would not be possible in a single exposure by “stopping down“ a macro lens, even one designed to be used at this magnification. The resolution loss from diffraction would be too great.
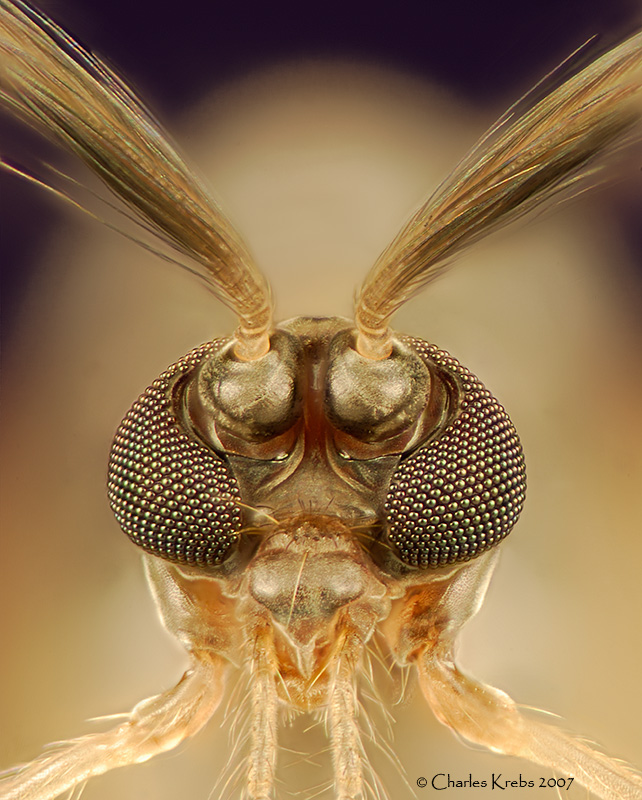
A midge portrait made using a Nikon CF M-Plan 10/0.25.
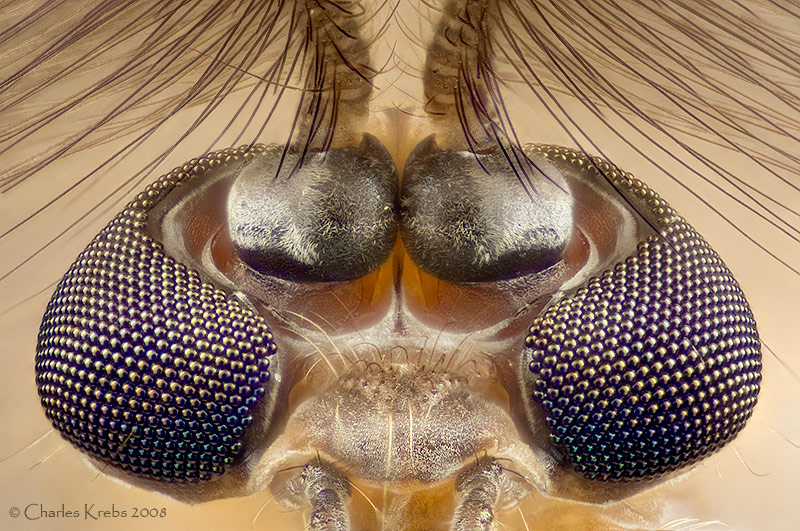
The remarkable wrap-around eyes can be clearly seen.
The quest for 20X.
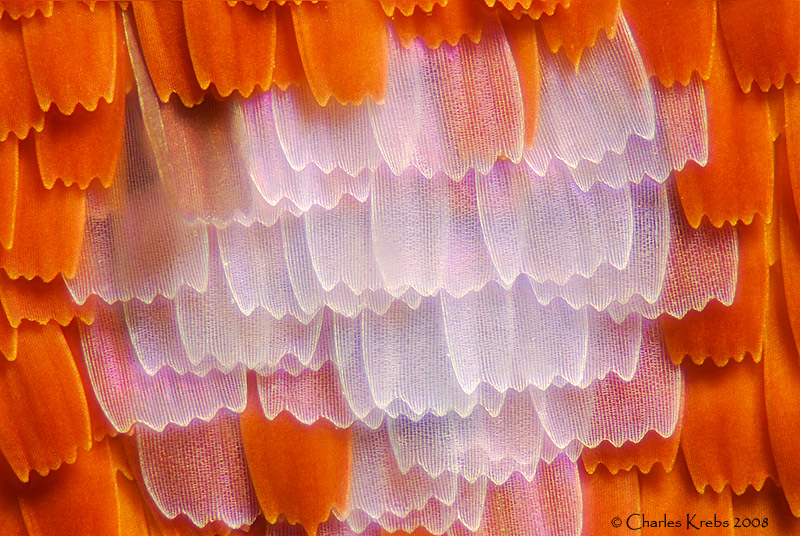
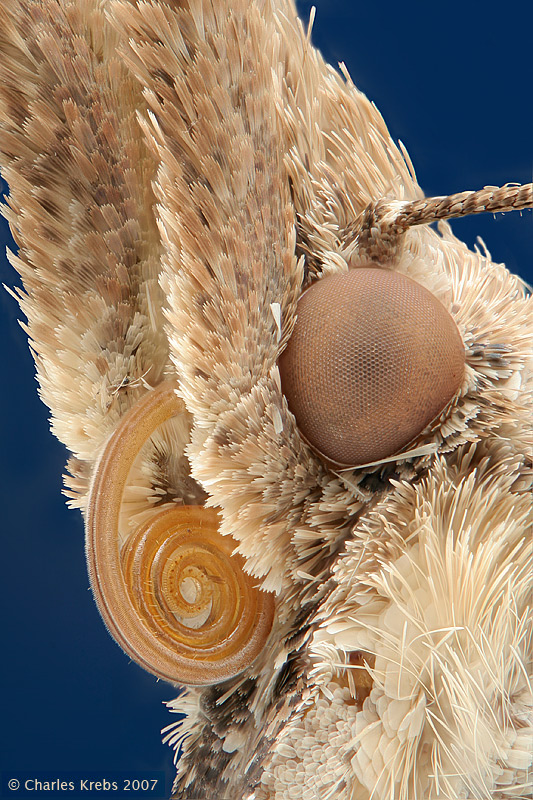
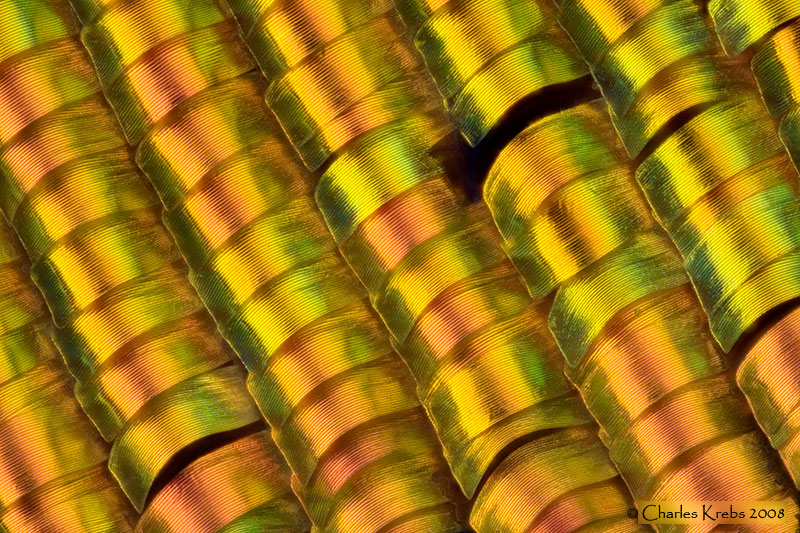
Satisfied with the 10X results I now tried a Nikon M-Plan 20/0.40 ELWD. It also provided superb image quality when used in this manner. This objective has a focal length of 11.1mm, and provides a working distance of 10.5mm. The first two images below are iridescent wing scales from a Sunset Moth (Urania riphaeus). The third is a head-shot of another midge specimen. The eyes on this insect are amazing to see.
It is interesting to note that f-number of this lens, based on it’s NA, would be about f1.2. When used at 20X on a bellows, the “effective aperture” would be about f25. A macro lens with a maximum aperture of f2.8, when extended to provide 20X would have an effective aperture of f59. With the sensor sizes of DSLRs, and the subsequent enlargement needed to produce a viewable image size, the resolution loss due to diffraction at (effective) f59 is extreme. Far more detail will be recorded at an (effective) f25.
Satisfied with the 10X results I now tried a Nikon M-
It is interesting to note that f-
How about 40X?
I could not resist trying the Nikon M-Plan 40/0.50 ELWD (wd=10.1mm) and the 40/0.40 SLWD (wd= 14.9mm). The numerical aperture is the same or just slightly larger than the 20/0.40, so I did not really expect to see much more detail in the pictures when compared to ones enlarged from the central areas of the 20X frames. While the difference was not large, the 40X images did look better than the enlarged 20X images. This could be due to the fact the the entire camera sensor area was utilized with the higher power objective, while only 25% of the sensor area was used when a portion of the 20X image was enlarged.
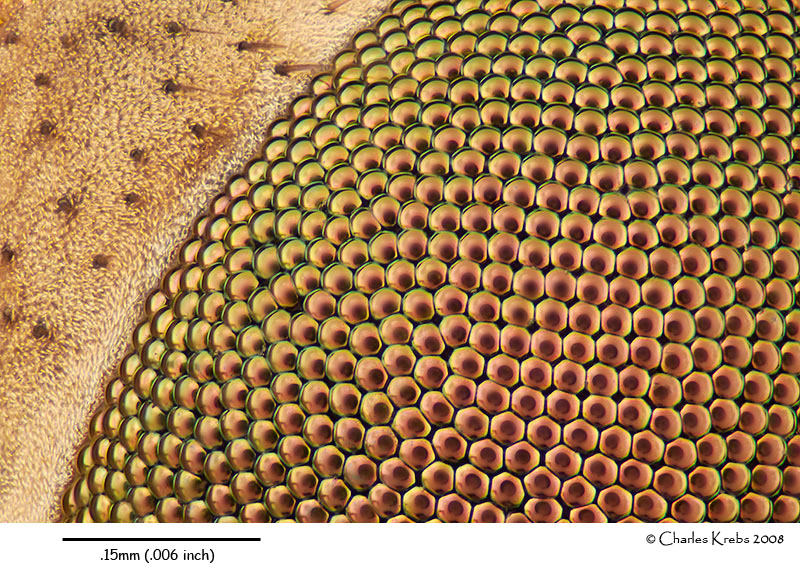
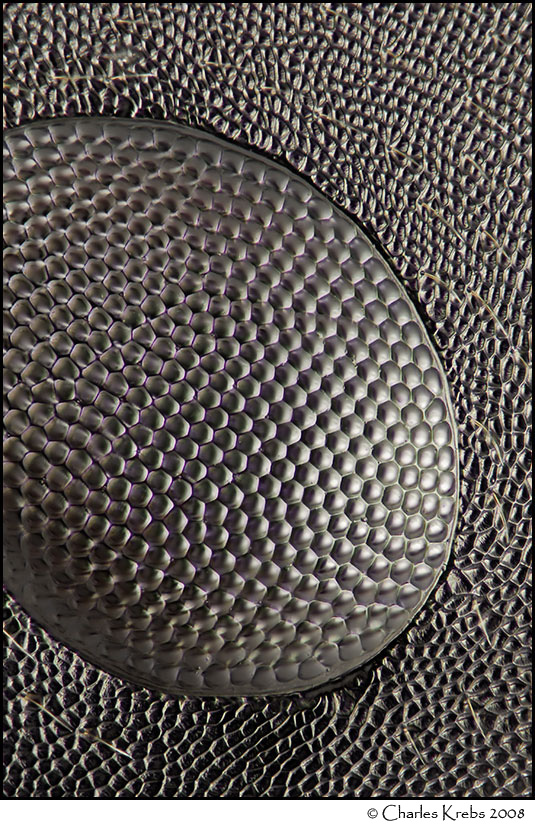
Below are three images made with 40X objectives. The upper image is of wing scales from a Salamis parhassus (butterfly). The middle image is of the eye of a carpenter ant (48 image stack). The lower image shows part of the eye of a cranefly (99 image stack).
I could not resist trying the Nikon M-
Below are three images made with 40X objectives. The upper image is of wing scales from a Salamis parhassus (butterfly). The middle image is of the eye of a carpenter ant (48 image stack). The lower image shows part of the eye of a cranefly (99 image stack).